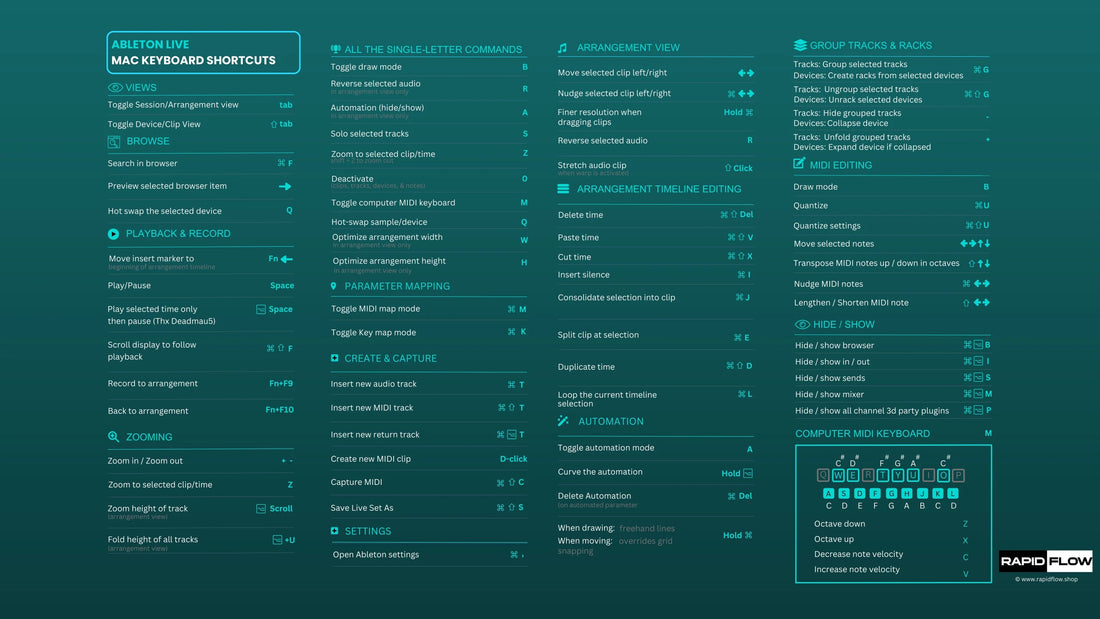
Does Ableton Support Keyboard Shortcuts? (Solved)
Embark on a journey towards efficient music production with our ultimate guide to Ableton keyboard shortcuts. Whether you're a beginner or a seasoned musician looking to enhance your skills, this comprehensive list of 41 essential shortcuts is designed to improve your workflow in Ableton Live.
Each keystroke will help you achieve seamless creativity from saving projects to fine-tuning parameters. Let's unlock the full potential of your music-making experience together!
What Are Keyboard Shortcuts?
Keyboard shortcuts in Ableton Live enhance workflow efficiency. They allow quick navigation, actions, and control without relying on the mouse. With them, users can save time and focus on music production.
Combining keys with modifier keys like Command (⌘) on Apple or Control (Ctrl) on Windows triggers specific commands or functions. They are versatile across tasks like editing audio clips, arranging tracks, adjusting parameters, or managing settings.
By mastering these shortcuts, users can unlock a whole new level of efficiency and creativity in their music-making endeavors.
What Types of Shortcuts Does Ableton Live Have?
Ableton Live has a vast array of keyboard shortcuts for music production, including navigation, track management, editing, view navigation, MIDI and audio clip editing, and other miscellaneous functions.
For instance, basic file management tasks such as saving, saving as, undoing actions, redoing actions, and searching within the project are available in Ableton, streamlining workflow.
Track management shortcuts enable users to efficiently organize their tracks by inserting new audio tracks, MIDI tracks, creating new MIDI clips, soloing selected tracks, grouping tracks, and renaming selections. These shortcuts enhance user productivity during music production.

Why Keyboard Shortcuts Are Your Secret Weapon
Keyboard shortcuts are essential for music producers and Ableton Live users because they save time, increase efficiency, and promote muscle memory development. So much so that we created a free 5K DAW key command desktops that show all the different key commands in Ableton, Bitwig, FL Studio, and Logic Pro.
They also offer a sense of empowerment and control over the software, allowing you to focus on the creative process and enhance productivity. With practice, navigating Ableton Live via keyboard shortcuts becomes as intuitive as playing an instrument.
41 Shortcuts You Should Start Using in Ableton

Basic Navigation and File Management
1) Save (⌘ + S / Ctrl + S)
Save your work quickly and efficiently in Ableton Live with the keyboard shortcut ⌘ + S / Ctrl + S. It's crucial to get into the habit of saving regularly to avoid losing progress or changes, and mastering this shortcut can be a lifesaver during unexpected crashes or technical issues.
2) Save As (⌘ + Shift + S / Ctrl + Shift + S)
In Ableton Live, use "Save As" (⌘ + Shift + S on Mac or Ctrl + Shift + S on Windows) to save a copy of your project without overwriting the original. This maintains organized project files and allows for easy experimentation.
3) Undo (⌘ + Z / Ctrl + Z)
Undo in Ableton Live is a helpful feature allowing users to revert to a previous state by pressing Command + Z on Mac or Control + Z on Windows. It promotes workflow efficiency and creativity in music production by fostering confidence in exploring new ideas and enhancing overall output.
4) Redo (⇧ + ⌘ + Z / Shift + Ctrl + Z)
Redo actions in Ableton Live by pressing Shift + Command + Z on a Mac or Shift + Ctrl + Z on a Windows computer. It allows you to explore different creative directions without losing progress and streamline your workflow.
5) Search (⌘ + F / Ctrl + F)
Ableton Live's Search feature (⌘ + F/Ctrl + F) helps you quickly find your project's tracks, clips, and devices. Enter keywords, and Live filters your project in real time, highlighting matches as you type, allowing you to locate items efficiently.
Track Management
6) Insert Audio Track (⌘ + T / Ctrl + T)
Add audio tracks in Ableton Live with the keyboard shortcut ⌘ + T (Mac) or Ctrl + T (Windows). This shortcut saves time and enhances workflow, ensuring a stress-free music-making experience.
7) Insert MIDI Track (⌘ + Shift + T / Ctrl + Shift + T)
Create MIDI tracks fast with the keyboard shortcut ⌘ + Shift + T on Mac or Ctrl + Shift + T on Windows in Ableton Live. This feature is handy for music producers who prefer a hands-on approach to music creation.
8) Insert New MIDI Clip (⌘ + Shift + M / Ctrl + Shift + M)
In Ableton Live, you can quickly add new MIDI clips using the keyboard shortcut ⌘ + Shift + M (or Ctrl + Shift + M for PC users). This helps you to save time and stay focused on the creative aspect of music production. You can experiment with different melodies or chord progressions by creating a fresh MIDI clip in the selected track.
9) Solo Selected Track(s) (S)
In Ableton Live, soloing specific tracks is essential to focus on individual elements. You can isolate a track by selecting it and pressing "S". Soloing is useful in mixing and editing to fine-tune each track's sound and identify issues. It streamlines workflow by eliminating distractions and allows you to concentrate on specific areas of your project.
10) Group Tracks or Devices (⌘ + G / Ctrl + G)
Ableton Live lets you group tracks/devices to manipulate multiple elements as a single unit. Press ⌘ + G on Mac or Ctrl + G on Windows to create a new group track. Grouping tracks enables easy manipulation of parameters, while grouping devices enables parallel processing or chain effects. Grouped tracks/devices can be collapsed or expanded for easy navigation and a decluttered workspace.
11) Rename Selection (⌘ + R / Ctrl + R)
Renaming selections in Ableton Live enhances your workflow. Use ⌘ + R on Mac or Ctrl + R on Windows to quickly rename tracks, clips, or devices. Assigning descriptive names promotes better communication among collaborators and facilitates a more seamless creative workflow.
Editing and Arrangement
12) Cut (⌘ + X / Ctrl + X)
In Ableton Live, the Cut shortcut (⌘ + X / Ctrl + X) is a crucial feature for cutting clips precisely, refining arrangements, and eliminating unwanted parts of a track. It streamlines production tasks, fosters a dynamic editing experience, and allows for creative audio manipulation techniques.
13) Copy (⌘ + C / Ctrl + C)
Copying in Ableton Live with keyboard shortcuts like Copy (⌘ + C on Mac or Ctrl + C on Windows) allows easy duplication of elements like clips, tracks, or devices. This feature empowers producers to replicate intricate patterns or complex arrangements across their projects, enhancing productivity and encouraging experimentation.
14) Paste (⌘ + V / Ctrl + V)
In Ableton Live, the Paste function (⌘ + V on Mac or Ctrl + V on Windows) lets you quickly duplicate and move content, such as clips, MIDI notes, audio recordings, or effects. By copying and pasting, you can replicate musical ideas across different sections of your project, streamlining the workflow and enhancing productivity. It's an essential tool for music producers.
15) Duplicate (⌘ + D / Ctrl + D)
Duplicate in Ableton Live (Command + D on Mac or Control + D on Windows) quickly creates copies of selected clips, tracks, or devices, saving you time and effort. Use it to repeat sections of music or create variations. Ableton Live creates an exact replica, including all settings and effects. Use it across different elements, tracks, and scenes to streamline your workflow and build upon existing ideas.
16) Split Clips (⌘ + E / Ctrl + E)
Splitting clips in Ableton Live quickly and easily divide audio/MIDI clips into smaller sections for precise manipulation. The shortcut ⌘ + E (Ctrl + E on Windows) is used to execute this function.
17) Loop Selection (⌘ + L / Ctrl + L)
Looping selections in Ableton Live using the shortcut ⌘ + L (Ctrl + L for Windows) can enhance your workflow by allowing you to set loop points around a selection, providing precision and efficiency in your editing tasks.
18) Consolidate Clips (⌘ + J / Ctrl + J)
Consolidating clips in Ableton Live is a powerful feature that merges multiple audio or MIDI clips into a single clip, streamlining workflow and managing projects more efficiently. To consolidate clips, select the clips you want to merge and use the shortcut ⌘ + J (Ctrl + J on Windows). This feature helps to save space and create smoother transitions between different sections of tracks, resulting in a more polished final product.
19) Grid Shortcuts (⌘ + 1, 2, 3, 4, 5 / Ctrl + 1, 2, 3, 4, 5)
Grid shortcuts (⌘ + 1-5 / Ctrl + 1-5) in Ableton Live help align notes or clips with precision. Pressing ⌘ + 1 sets the grid to whole notes, ⌘ + 2 to half notes, and so on. Similarly, using Ctrl instead of ⌘ accomplishes the same function on Windows systems.
These shortcuts allow for dynamic rhythm manipulation and precise alignment of musical elements within your composition. By mastering these shortcuts, you can work more efficiently and fluidly within Ableton Live's interface while easily unleashing your creative potential.
View Navigation and Window Management
20) Toggle between Session and Arrangement View (TAB)
Ableton Live's Session and Arrangement views are fundamental features that enhance workflow efficiency. The TAB key enables users to toggle seamlessly between them, allowing for a non-linear approach to music creation in the Session View, and a more structured composition experience in the Arrangement View.
21) Show/Hide Browser (⌘ + Alt + B / Ctrl + Alt + B)
The Show/Hide Browser keyboard shortcut (⌘+Alt+B/Ctrl+Alt+B) quickly toggles the visibility of the browser panel, which provides access to essential tools and resources like instruments, audio effects, and samples. Hiding the browser clears up screen space for arranging tracks and editing MIDI clips while bringing them back, enabling quick access during production or mixing.
22) Optimize Arrangement View Height/Width (H / W)
Optimizing track size in Ableton Live is crucial for a smooth workflow. Use 'H' to adjust height and 'W' to adjust width. These shortcuts streamline editing and empower users to tailor their workspace for specific requirements.
23) Zoom In or Out (+ or -)
Zooming in and out is a crucial feature in Ableton Live that helps users focus on specific details or get an overview of the entire arrangement. To zoom in, press "+". To zoom out, press "-". Mastering this functionality is essential for efficient workflow and detailed editing.
24) Zoom to Selection (Z)
Use the "Zoom to Selection" shortcut (Z) in Ableton Live to focus on a specific area and adjust the zoom level of your view for easy viewing and editing.
25) Fold or Unfold Selected Tracks (U)
Efficiently organizing and managing tracks is crucial in Ableton Live. Use the 'U' key command to Fold or Unfold Selected Tracks for a cleaner workspace. This feature is helpful when dealing with large projects or during mixing sessions.
Editing MIDI and Audio Clips
26) Transpose Octaves (Shift + ↑ or Shift + ↓)
Transpose Octaves in Ableton Live allows you to quickly shift MIDI notes up or down by entire octaves using Shift + Up/Down arrow keys, helping you experiment with musical ideas and explore variations in your compositions.
27) Activate/Deactivate Selection (0)
Activate or deactivate a selection in Ableton Live by pressing "0". This feature is helpful for complex arrangements or live performances, allowing producers to control which parts of their project are active.
28) Fine Tune Parameters (⌘ + Drag / Ctrl + Drag)
Using keyboard shortcuts in Ableton to fine-tune parameters enhances workflow and precision. Holding down Command or Control while dragging a parameter allows for real-time, accurate adjustments. This is useful for producers and performers who need to control elements of their music quickly and accurately.
29) Create Fade or Crossfade (⌘ + Alt + F / Ctrl + Alt + F)
Ableton Live's fades and crossfades feature allows for seamless transitions between audio clips. Mastering the keyboard shortcut ⌘ + Alt + F on Mac or Ctrl + Alt + F on Windows can significantly enhance your workflow efficiency and overall audio production quality.
30) Reverse Audio Clip (R)
Reversing audio clips in Ableton Live is a creative technique that can add unique effects and textures to your compositions. To reverse an audio clip, select it and press the "R" key. Reversed audio can be used subtly or prominently, and experimenting with different lengths can create dynamic transitions. Combining original and reversed audio can result in intricate sonic landscapes.
31) Insert Silence (⌘ + I / Ctrl + I)
Use ⌘ + I (Ctrl + I for Windows) in Ableton Live to insert silence into audio clips. This creates pauses or breaks in your tracks without altering existing content. It enhances the dynamics of your music and creates anticipation.
Join Over 4,000 Producers: Discover why musicians rave about our templates and pre-mixed sample packs. Start with the Infinity Bundle and Masterclass today!
Other Useful Shortcuts
32) Help Menu (⌘ + ? / Ctrl + ?)
The Help Menu in Ableton Live provides a guide to using the software and includes a search bar to find specific information. It includes links to external resources and can improve workflow and problem-solving capabilities.
33) Show/Hide Clip Launcher (Tab or ⇪ Caps Lock)
Ableton Live's Clip Launcher is vital for launching clips in Session View. Use 'Tab' or 'Caps Lock' to quickly show or hide it. Tab also helps switch between different views. Caps Lock removes distractions and provides a clean interface for focused work.
34) Show/Hide Inspector (⇧ + I)
Pressing Shift + I in Ableton Live toggles the Inspector panel, which provides detailed information and controls for the selected track or device. By hiding the Inspector when not needed, you can declutter your workspace and focus on the main elements of your project.
This quick shortcut enables seamless toggling between showing and hiding the panel, allowing you to maintain a clean workspace while still having essential track information readily available at your fingertips. The Inspector feature streamlines editing tasks and contributes to a smoother overall production experience within Ableton Live.
35) Show Preferences (⌘ + , / Ctrl + ,)
Accessing the Preferences in Ableton Live is essential for customizing the software's various settings. You can use the keyboard shortcut ⌘ + , (Command + Comma on Mac) or Ctrl + , (Control + Comma on Windows) to open the Preferences window quickly. There are tabs for audio, MIDI, file folder, and look/feel settings.
You can configure audio input/output devices, MIDI controllers, file folder paths, and visual display options. Learning these quick access shortcuts streamlines workflow efficiency in Ableton Live, granting users greater control over their production environment while saving valuable time.
36) Minimize Window (⌘ + M / Ctrl + M)
Pressing ⌘ + M on a Mac or Ctrl + M on a PC minimizes the Ableton Live window, decluttering workspace and providing quick access to other resources without closing the software. The minimized window remains active and can be restored with a single click.
37) Close Window (⌘ + W / Ctrl + W)
Closing Ableton Live windows is essential to declutter your workspace and focus on your work. Use the shortcut ⌘ + W on Mac or Ctrl + W on Windows to close any open window instantly. Be mindful of unsaved work, as Ableton Live prompts users with a confirmation dialog if there are unsaved changes when attempting to close a window.
38) Return to Default (Del or double-click parameter)
You can return parameters to their default values in two ways - by pressing the "Delete" key or double-clicking on the parameter. The "Delete" key is a quick way to reset the selected parameter, whereas double-clicking on a parameter provides more precision and visual feedback. Mastering these techniques can streamline your workflow and enhance your music production experience.
39) Custom Shortcuts (⌘ + K / Ctrl + K)
Custom Shortcuts in Ableton Live allow users to assign personalized key combinations to frequently used commands or actions, streamlining their creative process and work more efficiently. To create custom shortcuts, users can navigate to the Preferences menu, select the "Link/MIDI" tab, and click on the "Key Mapping" button.
Once in Key Mapping mode, users can assign key commands to various functions within Ableton Live by hovering their cursor over any feature or control.
40) Mapping Parameters (⌘ + M / Ctrl + M)
Ableton Live's Mapping Parameters feature allows users to assign controls to hardware controllers, enhancing workflow efficiency. By pressing ⌘ + M (Ctrl + M on Windows), users can enter Mapping Mode and assign any parameter to a physical control. This customization allows for seamless integration of external hardware and quick access to parameters during live performances or studio sessions.
41) Using Keyboard as MIDI Controller (M)
Using the keyboard as a MIDI controller in Ableton Live is a quick and intuitive way to assign specific functions to different keys on your keyboard. This feature allows you to play notes, trigger samples, control effects, and more directly from your computer keyboard, and is especially useful for those who do not have a physical MIDI controller at hand or want to quickly sketch out musical ideas without setting up additional equipment.
With the ability to map multiple functions across different octaves of the keyboard, this feature offers flexibility and convenience that empowers you to express yourself musically with ease.
Frequently Asked Questions
How Do I Use the Keyboard in Ableton?
Keyboard shortcuts in Ableton Live can significantly improve your efficiency and productivity. Customizing your key mappings and incorporating commonly used shortcuts can help you perform tasks quickly. Leveraging the keyboard's capabilities can revolutionize how you interact with the software and enhance your creative output.
Why Is My Keyboard Shortcut Not Working in Ableton?
Keyboard shortcuts not working in Ableton Live could be due to conflicting shortcuts, system-wide shortcut overrides, outdated software versions or compatibility issues. To address this, users can customize shortcuts, adjust system settings, update software, and ensure all drivers and components are up-to-date.
How Do I Create a Keyboard Shortcut in Ableton?
To create custom keyboard shortcuts in Ableton Live, use Key Map mode. Click on the "Key" button or press ⌘ + K (Ctrl + K on Windows) to access it. Then, select an element and press your desired key or combination to assign a new shortcut.
Custom keyboard shortcuts can streamline your workflow, save time, and make Ableton more intuitive. By assigning commonly used functions or actions to personalized shortcuts, you can focus on the creative aspects of music production.
Conclusion: How Keyboard Shortcuts Can Help Save You Time
Mastering the intricacies of Ableton keyboard shortcuts isn't just about boosting efficiency; it's about unleashing the full potential of your music-making journey. By seamlessly integrating these shortcuts into your creative process, you save time and pave the way for uninterrupted inspiration.
From saving projects with a simple key press to fine-tuning parameters with precision, these shortcuts are the keystrokes to unlocking your creativity and elevating your music production to new heights.