Ableton's Best Export Settings (Detailed)
Are you looking to unlock the full potential of your music production? Then, you need to learn the art of exporting audio in Ableton Live. Getting the export settings right is crucial for achieving pristine sound quality and compatibility with different platforms.
Whether you're a beginner or an experienced producer, our comprehensive guide will help you master the process and achieve the best export results possible. Join us on this journey to discover the secrets behind exporting audio in Ableton Live.
Why Export Settings Are So Important
Export settings in Ableton are critical to ensure high-quality audio output. They guarantee consistency across different playback systems, impact the quality of mixdowns, and are necessary for effective mastering and music distribution.
Understanding how these settings affect various aspects of the production workflow can help you create professional-grade music.
How Use Case Affects Export Settings
Exporting audio from Ableton requires different settings for different purposes.
- For personal listening or sharing, a compressed format like MP3 with a 256 or 320 bitrate works. (anything lower starts to sound bad)
- For mixing, use a lossless format like WAV or AIFF with a high sample rate and bit depth.
- For mastering, provide the highest possible quality files to preserve sonic integrity.
Platforms have different guidelines for distribution. Understanding how each purpose impacts settings will help you balance audio quality, file size, compatibility, and suitability.
Listening
To export audio from Ableton, you need to take a few important steps. First, listen to your mix to evaluate its quality, balance, and clarity. Use high-quality studio monitors or headphones in a controlled environment with minimal background noise.
Pay attention to elements like instrument separation, frequency balance, dynamics, and tonal quality. Test your track on different speakers and headphones to ensure that it sounds consistent across different playback systems.
If any issues arise, revisit your mix and iterate through the process. Make the necessary adjustments to achieve the best possible sound quality before finalizing your export settings.
Mixing
Mixing is an essential stage in music production, and it plays a significant role in determining the overall quality of your final mixdown. When exporting your mix from Ableton, consider levels, panning, EQ, compression, and effects.
Proper level management prevents any parts from overpowering or getting lost. Panning creates a sense of width and depth, while EQ shapes individual elements. Compression controls dynamics, and effects add depth and character.
Listen critically and make informed decisions to refine your mix. This ensures a well-crafted and cohesive musical experience for your listeners.
Join Over 4,000 Producers: Discover why musicians rave about our templates and pre-mixed sample packs. Start with the Infinity Bundle and Masterclass today!
Mastering
Mastering is a crucial step in music production. When exporting from Ableton for mastering, export an unprocessed mixdown with appropriate levels and headroom. Choose a high-quality, uncompressed format like WAV at minimum 44.1 Khz with a 24-bit depth setting.

Some people prefer to export at a higher sample rate such as 96 Khz, 24 bits so the master can also be a higher resolution file. Some streaming services accept these higher resolution files, so if you want to keep your options open (and your computer can handle the extra load) this is a good idea.
Let's celebrate Erik's birthday with an incredible giveaway! Use the code "BIRTHDAY" to download the Rapid Flow Mastering Chain for free permanently. Comment on the post for a chance to win one of six 3X Infinity Bundles, each valued at €249. Don't miss out on this limited-time offer. Join the celebration, download, and comment now!
Distribution
Consider the export settings in Ableton to ensure your music sounds great across various platforms and formats.
- Streaming Platforms: Always export your final master in a lossless (WAV or AIFF) format, as all streaming services accept these files and will convert them for you to whatever it uses for streaming. Formats such as AAC or MP3, even with a bit rate of at 320 kB/Sec will be missing audio information. These are so-called "lossy" formats!! The only reason to use this is for a quick listen on a boombox or sending to a friend while keeping the file size small.
- Radio Play: Export as 16-bit WAV files at a sample rate of 44.1 kHz for compatibility with most radio station playback systems. This is the same audio quality that was used for CDs and is absolutely good enough for most use cases. It is most widely compatible with playback devices that play from a USB stick or SD card.
- Physical Copies: Export in high-quality lossless formats (16 or 24 bit and 44.1 Khz or higher) for optimal sound quality during duplication or replication processes. If needed it is always possible to reduce the bits or sample rate at the vinyl pressing house, so better to offer a file that they can adapt if needed.
Maintain consistency in the quality of your exported audio files to ensure that your music sounds as intended across different playback systems and devices.
The Best Export Settings For Ableton
If you want to export high-quality audio files from Ableton, it's important to consider a few key factors. These factors play a crucial role in ensuring that your exported audio files sound great. Let's take a closer look at each of these factors to understand how they impact the final outcome.
Selection
To export audio from Ableton, start by selecting the section you want to export. Consider the purpose of your exported audio and use Ableton's audio editing features to make an accurate selection. Disable any unwanted effects or processing before making your selection.

You can export individual tracks separately or use the export "All Individual Tracks" in the drop down menu of "Rendered Track" option to export all tracks simultaneously. This feature is useful for complex projects.

By carefully choosing and refining your selections, you can ensure that only relevant portions are included in the final export. This attention to detail will greatly enhance both the clarity and usefulness of your exported file while saving unnecessary processing time during exportation.
Rendering
Rendering is a crucial step in exporting your Ableton project. It converts your project into a standalone audio file that can be played or shared outside of Ableton Live. Select the range of your export and choose which elements to include.
Real-time processing can be disabled for faster exports. Choose the right sample rate, bit depth, file format, and track export preference. Tailor your choices to suit your needs and ensure your exported tracks maintain their integrity.
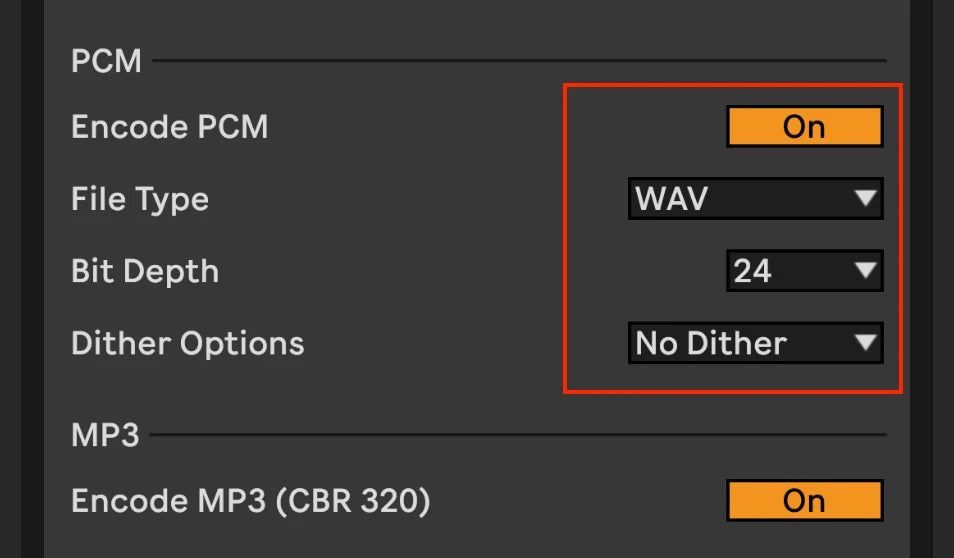
Pulse Code Modulation (PCM)
Pulse Code Modulation (PCM) is a digital encoding method used in lossless audio file formats. For exporting audio from Ableton, it is recommended to use PCM as the standard format since it offers lossless compression and excellent fidelity. PCM file formats are WAV and AIFF, so choose one of these. Generally we would recommend WAV as it is the most widespread.
Choosing a suitable sample rate for your export depends on your project requirements and target distribution platform. A standard sample rate of 44.1 kHz and 16 Bits if it’s the final master should suffice for producing music for online streaming services or CD release. (If you are sending the file to a mastering engineer make sure you use 44.1 Khz and 24 bits stereo as a minimum)
However, for high-resolution projects or distributing music to high resolution platforms like Tidal, Amazon Music HD or Apple Music HD a higher sample rate, such as 88.2 kHz or 96 kHz, Wav files in 24 bits is advisable. If your music contains a lot of recordings captured at higher sample rate with microphones (think classical music or singer songwriter) going all the way up to 192 Khz, 24 bit can be advisable.
Additionally, be mindful of bit depth settings when exporting with PCM encoding. The most common bit depths are 16-bit (CD quality) and 24-bit (high-resolution). Choosing a higher bit depth, like 24-bit during exportation, allows for a greater dynamic range and improved signal-to-noise ratio.
Bit Depth
Bit depth refers to the number of bits used to represent each sample in a digital audio file. The dynamic range and resolution of the audio depend on it. When exporting from Ableton, choose 24-bit depth for high-fidelity, professional-quality projects at a minimum.
If your material was recorded at 32 Bits (record settings) you can also export the final master at 32 bits. In essence this means you have a huge dynamic range possibility. While this can be useful for very dynamic music (film scores, classical music) most modern music types will not benefit from going from 24 bits to 32 bits, and as the files generated are much larger, we rarely recommend using 32 bits.
16-bit is sufficient for online streaming, personal use or sharing with a DJ as most devices will play these files. Reducing the bit depth from 24-bit to 16-bit during export won't necessarily result in an audible loss of quality, as long as you dither. However, going lower than 16-bit can introduce quantization errors and noticeable degradation in sound quality.
The appropriate bit depth is crucial for preserving audio fidelity and dynamics in your final mix.

Dithering
Dithering is a crucial step in exporting tracks from Ableton that aims to minimize quantization errors and improve audio quality. Applying dithering means adding a minimal amount of very low level noise to the audio signal before reducing the bit depth as described above.
Basically you need dither when reducing the bit depth of a file. Say if you are exporting a 24 bit file to 16 bit to give to a DJ… in this case you need to switch on dither in Ableton’s export settings..

Overview of what each Ableton dithering algorithm is recommended for:
No Dithering: Disables dithering.
Rectangular: Evenly spreads harmonic noise; susceptible to quantization errors.
Triangular: Ableton’s default; safely handles quantization error distortion.
POW-r 1: Ideal for quiet sounds such as acoustic instruments and vocals.
POW-r 2: Suitable for medium-volume audio samples.
POW-r 3: Optimal for loud tracks, especially rock and EDM; genre-specific.
Different types of dithering algorithms are available in Ableton - triangular (TPDF) and noise-shaped (NS) dithering are the most commonly used. When deciding whether or not to use dithering during export, consider if you are coming from a higher bit depth file. If yes (most people record into Ableton at 24 bit) then turn on dither.
If exporting tracks for CD production or other formats with lower bit depths like MP3s, applying dithering can help maintain optimal audio quality throughout various playback systems. Accessing and configuring the settings during export is straightforward.
In the Export Audio/Video dialog box within Ableton's Export menu option, under the "Rendered Track" section, you'll find the "Dither Options." Here, you can select your preferred dithering algorithm and adjust its settings.
By applying appropriate dithering algorithms during bit depth reduction, you can effectively minimize quantization errors and preserve the integrity of your audio recordings.
Make sure to consider your target platform and medium for distribution to determine whether or not to apply dithering during export, ensuring that your final output has the highest possible audio fidelity.
File Type

Choosing the right file type for Ableton exports is important to preserve audio quality and compatibility. WAV and AIFF are uncompressed and ideal for professional audio production and archiving. FLAC is a suitable compressed alternative.
MP3 is commonly used for online streaming but sacrifices quality. Ableton 11 by default only offers 320 kB/Sec CBR (constant Bit rate) files as an export option. If you select this, Ableton will generate a 320 kB/Sec MP3 file. Choose a file type based on your specific needs.
Understanding the characteristics of each format is essential for optimal audio quality and compatibility throughout production and distribution.
How To Export High-Quality Audio From Ableton
To export high-quality audio from Ableton, follow these steps:
- Select the desired section of your project.
- Choose the correct file type based on your intended use.
- Pay attention to PCM during exporting to determine dynamic range and overall fidelity.
- Use dithering to ensure accurate playback of finely detailed audio if you are reducing bit depth.
- Check other critical settings like sample rate and that you are exporting to stereo before finalizing your export.
Keep in mind that achieving optimal results often requires balancing file size, compatibility, and overall audio fidelity. Experimentation and adaptation are essential to finding the perfect export settings to suit your unique creative endeavors.
Frequently Asked Questions
What Is the Best Buffer Size to Export Ableton?
Choose an appropriate buffer size when exporting audio from Ableton. The buffer size affects audio playback and recording latency, not the audio file's quality. Consider your computer's processing power and resources and the project's complexity when selecting the buffer size.
Generally most computers perform well with a buffer size of 256 or 128. Below this latency will be lower, but your computer’s CPU will be much more heavily taxed when trying to playback audio.

Experiment with different buffer sizes and monitor CPU usage to find the best balance between smooth exportation and system performance. Ableton provides various options for setting your preferred buffer size in its preferences menu under "Audio," ranging from 128 to 1024 samples or more. 1024 will mean there is a noticeable lag between what you see on screen and what you hear, so only use this if your computer is struggling to keep up.
What Sample Rate Should I Export to Ableton?
When exporting audio from Ableton, consider the sample rate. Choose the appropriate rate for digital distribution or professional production. A common rate for digital platforms is 44.1 kHz. For professional audio production, use higher rates like 48 kHz (often used in video and games) or 96 kHz all the way up to 192 kHz for most accurate sound reproduction.

Opt for higher rates if your project includes (acoustically recorded) high-frequency content or you plan to use time-stretching or pitch-shifting extensively. Higher rates require more processing power and storage space. Strike a balance between audio quality and file size.
Should I Normalize Export Ableton?
Normalization is a feature used in audio production software to adjust volume levels. When exporting from Ableton, normalizing may not always be necessary. Normalization alters dynamic range and could introduce artifacts, distortion, or clipping.

Basically Ableton will make the file as loud as possible before clipping. DON’T normalize any files you are sending to a mastering engineer. If there is 10-6 dB of “unused” dynamic range at the top of a 24 bit file, that is ideal for mastering. Meaning your master channel should not peak higher than -6 dB full scale on your Ableton meters. If this is the case lower your mix, not your master fader!
It could also limit your flexibility in achieving optimal results during further processing. Mastering engineers prefer working with unnormalized files. Consider your specific requirements and preferences as an artist or producer when deciding whether or not to normalize.
Should I Dither Before Mastering?
Dithering is important when exporting audio from Ableton before mastering. It involves adding a small amount of noise to improve sound quality. Some argue that dithering should be applied during export to minimize artifacts, while others prefer it during the final stage of mastering.
We generally recommend to only dither when you are going from 32 bits to 24 bits or 24 bits to 16 bits. If this is not the case don’t add dithering noise! Consulting with experienced mastering engineers in advance can help find the best approach.
If you plan to deliver your mastered audio without downgrading, dithering is likely not necessary, but proper dithering for online or physical media distribution can ensure optimal sound quality. This is usually done by the mastering engineer. If you are mastering yourself, make sure you switch on dithering when you make the final export to 16 bits 44.1 kHz
Conclusion: Ableton’s Best Export Settings
Achieving the perfect export settings in Ableton Live is crucial for any music producer. However, what if you could accelerate your music production process without compromising quality? That's where Ableton Templates come in - pre-configured setups and creative tools that can inspire and streamline your workflow.
Whether you're a seasoned producer seeking efficiency or a newcomer looking to unleash your creativity, the world of Ableton Templates is waiting for you. Discover how these templates can transform your music production experience. Stay tuned for more information!